GUIDE
Twitter API Authentication in 2026: OAuth, Bearer Tokens, and Fixing 401
How Twitter (X) API authentication works in 2026: the four credential types, OAuth 1.0a versus OAuth 2.0, generating and using a bearer token, runnable Python and Node.js, and a fix for every 401 Unauthorized and 403 error, plus the one-header alternative.
Per our own spec, 70 of 121 endpoints bill $0.0008, 24 are free, and 27 sit between $0.0016 and $0.01. Every price ships inside our published OpenAPI document as an x-cost-usd field, so any figure in this post can be checked against the contract that bills it rather than taken on trust.
Authentication is where most Twitter API projects stall on day one. The call itself is a single HTTP request, but the credential you attach to it is the part that decides whether you get JSON back or a blunt 401 Unauthorized. X exposes four different credential types across two OAuth flows, and the docs describe each one on a separate reference page without ever showing a complete working request. So developers copy a key into the wrong header, search "Twitter API authentication failed", get 32 - Could not authenticate you, and lose an afternoon to a problem that is really just a credential-type mismatch.
This guide fixes that. It defines the four credentials and what each is for, explains OAuth 1.0a versus OAuth 2.0 in plain terms, shows a runnable authenticated request in Python and Node.js, and maps every common 401 and 403 to its actual cause and fix. Every code sample was run against a live API before publishing. At the end it shows the one-header alternative, where a single bearer key authenticates a read with no developer account and no OAuth handshake at all.
TL;DR: Twitter (X) API authentication sends a credential in an
Authorizationheader that X validates before returning data. For reading public data, generate an OAuth 2.0 app-only bearer token and send it asAuthorization: Bearer <token>. For acting as a user, such as posting, use OAuth 1.0a user-context signing with your API key, API secret, and per-user access tokens. A401 Unauthorizedalmost always means you sent the wrong credential type, usually the API key where a bearer token belongs. A403 Forbiddenmeans you authenticated but your app is not attached to a Project or your access tier lacks the endpoint. On a direct API like TwitterAPIs authentication is one bearer header for reads at $0.0008 a call with $0.50 in free credits, no developer account, no signing.
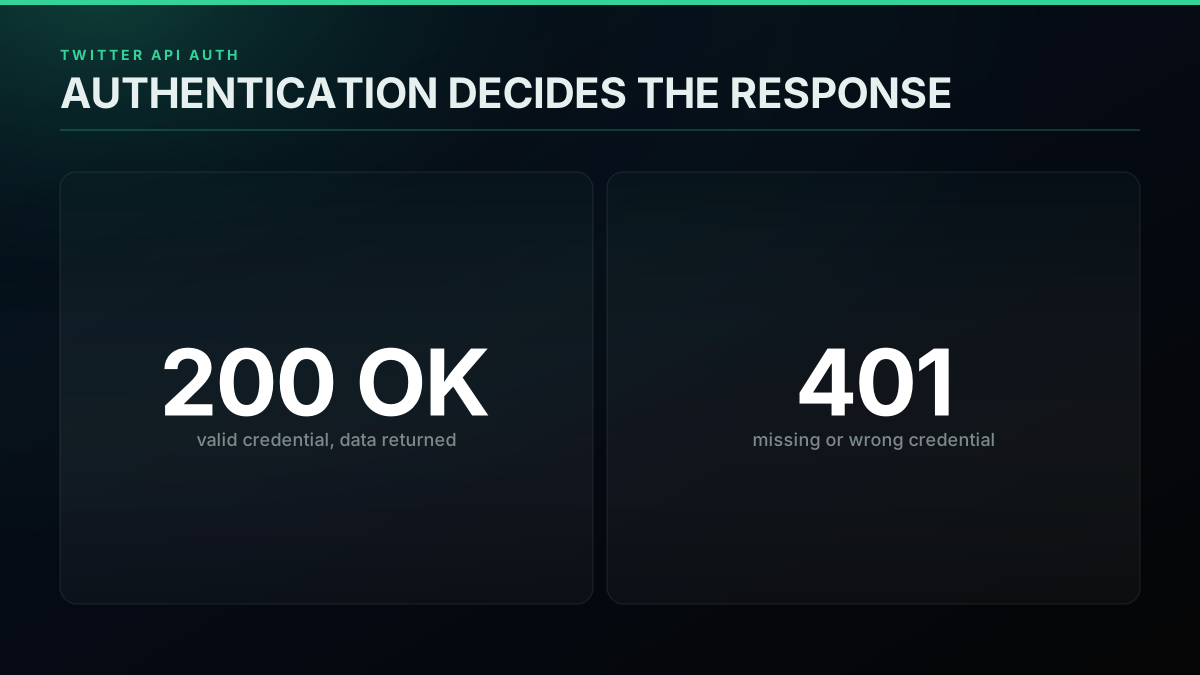
What authentication decides: a 200 with data, or a 401
How Does Twitter API Authentication Actually Work in 2026?
Every request to the X API carries a credential in an Authorization header, and X validates that credential before it returns a single byte of data. There are four credential types spread across two OAuth flows, and the flow you use depends on what you are trying to do. Reading public data uses OAuth 2.0 app-only, which needs one bearer token. Acting as a specific account, like posting a tweet or sending a DM, uses user-context authentication, which needs your app credentials plus per-user access tokens. The endpoint you call expects one specific flow, and if the credential you send does not match, the request fails before your logic ever runs.
That mismatch is the root of nearly every authentication problem developers hit. The credential is often valid, it is just the wrong kind for the endpoint, or it is attached to an app that is not entitled to that endpoint. Hold that model in mind and the rest of this guide is mechanical: pick the flow, generate the right credential, send it in the header, and read the error map when X says no. For the acquisition side, where you actually obtain these credentials, the how to get a Twitter API key guide walks the developer-portal path; this guide picks up once you have credentials and need to authenticate with them.
Authentication on the X API follows the OAuth 2.0 framework, the same standard behind most modern APIs, so the concepts here transfer well beyond X. The reason it feels harder than a typical API key is that X supports two OAuth flows at once and layers an access-tier check on top, so a request can clear authentication and still be refused. If you are weighing whether to pay for access at all before you wire any of this up, the is the Twitter API free breakdown covers what changed when the free tier ended, and the Twitter API cost guide prices a real workload.
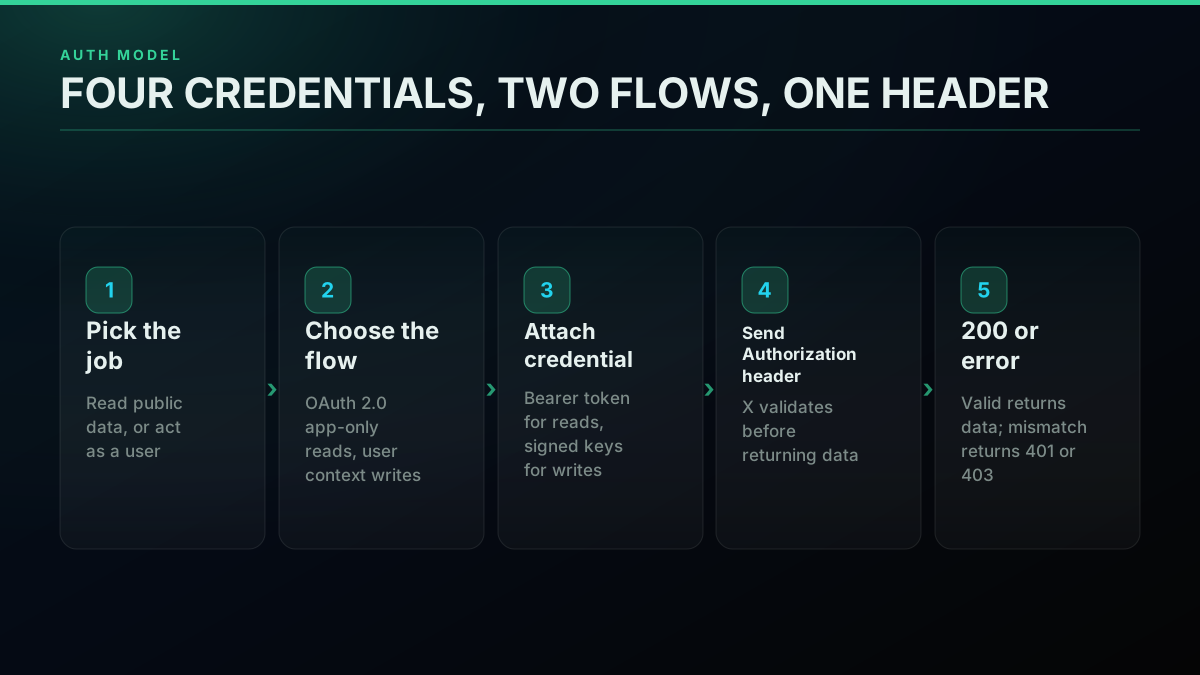
How the four credentials map to two flows and one Authorization header
The demand for a clearer path here is loud, because the friction pushes developers to reconsider the whole official route:

JB
@JasonBotterill
it’s ridiculous how expensive the X API is for users for doing anything useful why isn’t it just included with premium.
Cost is downstream of authentication because you cannot even reach a funded read on the official API until the developer account and app are configured. That is the reason a market of direct APIs exists, and it is the frame for the rest of this guide: understand the official flow fully, then decide whether you want to run it or skip it. The complete Twitter API tutorial covers the surrounding request lifecycle if you want the wider context first.
What Are the Four Twitter API Credentials, and Which One Do You Need?
The X API has four credential types, and knowing which is which removes most authentication confusion. The API key and secret, also called the consumer key and secret, are your app's root identity; you use them to sign OAuth 1.0a requests or to mint other tokens, and you rarely send them raw. The bearer token is an OAuth 2.0 app-only credential derived from your app; it is the single string you put in the Authorization header to read public data. The access token and secret are per-user OAuth 1.0a credentials that let your app act as one specific account. The OAuth 2.0 user-context tokens do the same acting-as-user job under the newer flow with scopes. Match the credential to the job and the header stops fighting you.
The table below is the reference to keep open while you wire up auth. The single most common mistake is reaching for the API key when the endpoint wants a bearer token, which returns a 401 even though the key is perfectly valid.
| Credential | Flow | What it authenticates | Use it for |
|---|---|---|---|
| API key and secret (consumer key and secret) | OAuth 1.0a / token minting | The app's root identity | Signing user-context requests, generating tokens |
| Bearer token | OAuth 2.0 app-only | The app, no user | Reading public tweets, users, search |
| Access token and secret | OAuth 1.0a user context | A specific user account | Posting, liking, following as that user |
| OAuth 2.0 user-context tokens | OAuth 2.0 with scopes | A specific user, scoped | Modern write flows with granular scopes |
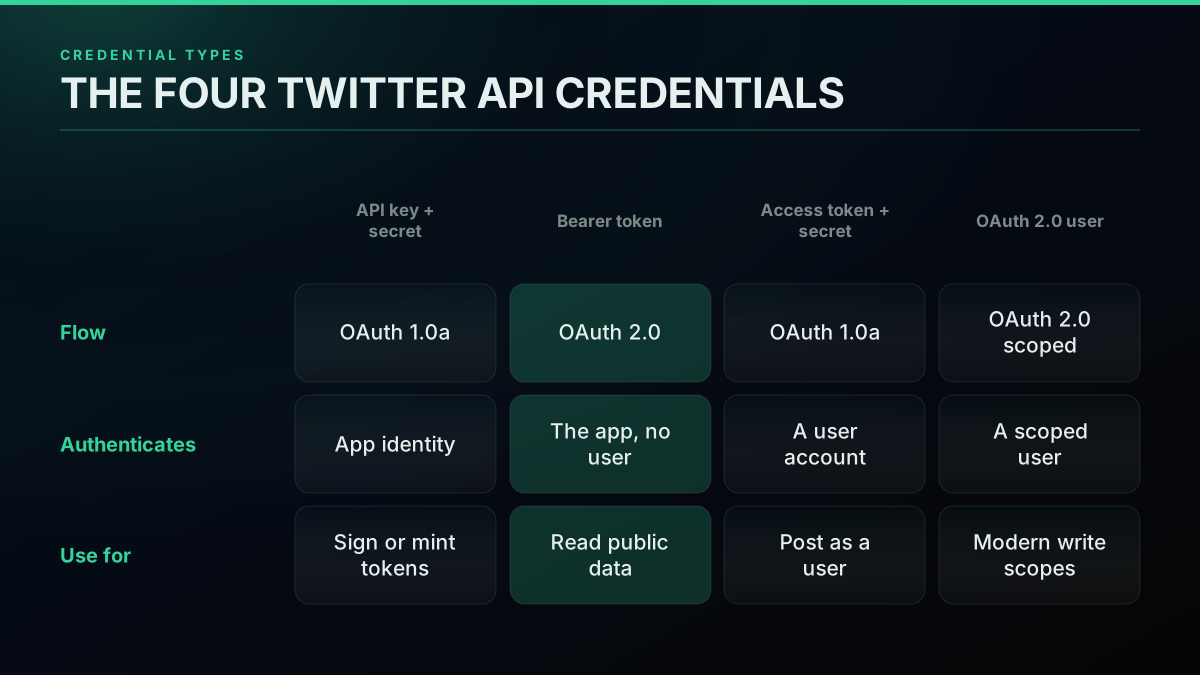
The four credential types and what each one is for
If you only need to read public data, which is the majority of API projects, you need exactly one of these: the bearer token. Everything else in the table exists for acting as a user. Keeping that distinction sharp is the fastest way to stop guessing which value belongs in the header. For the endpoint-by-endpoint view of what each credential unlocks, the Twitter API reference hub maps the full surface.
OAuth 1.0a vs OAuth 2.0: Which Flow for Which Job?
The two flows split cleanly by job. OAuth 2.0 app-only authenticates your application with a bearer token and reads public data, and it does not involve any user, which is exactly why it is the simplest path. The official docs describe it plainly: the bearer token "authenticates requests on behalf of your developer App. As this method is specific to the App, it does not involve any users." OAuth 1.0a user context authenticates your app acting as a specific person, using a signature built from your consumer key, consumer secret, and that user's access token and secret. If you are reading, use the bearer token. If you are writing or acting as an account, use user context. That is the whole decision.
OAuth 1.0a is more work because every request is cryptographically signed, and a signature depends on your system clock being accurate, the exact parameter ordering, and correctly paired keys. This is why write projects hit more auth walls than read projects: there are more moving parts in the signature. OAuth 2.0 app-only avoids all of that for reads, since you send a static bearer string. The Twitter API rate limit guide covers how each flow is metered once you are authenticated, because the flow you choose also affects your limits.
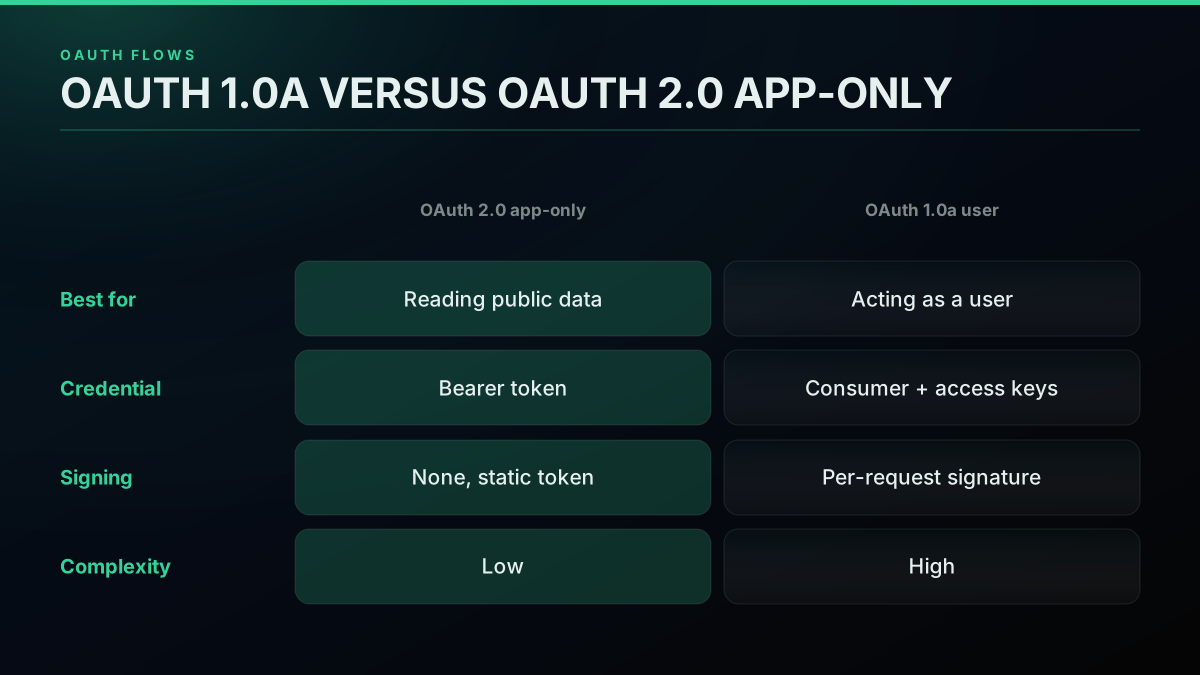
OAuth 1.0a versus OAuth 2.0, and which job each flow does
A useful rule of thumb: default to OAuth 2.0 app-only and only step up to user context when you genuinely need to act as an account. Most sentiment analysis, monitoring, research, and data pipelines are read-only and never need the signing machinery at all. The Python Twitter API tutorial and the Twitter API Node.js tutorial both build on the read flow, so they are the natural next stops once your bearer token works.
How Do You Generate and Use an OAuth 2.0 Bearer Token?
Generating a bearer token happens in the X developer portal, not in code. You create a Project, create an App inside it, open the App's Keys and Tokens tab, and generate the bearer token there. The tweepy documentation says the same: "The simplest way to generate a bearer token is through your app's Keys and Tokens tab under the Twitter Developer Portal Projects and Apps page." Once you have the string, using it is one header. You send Authorization: Bearer <token> on every read request, and X returns data. There is no exchange step and no refresh for app-only tokens, which is what makes this the simplest flow.
Two things trip people up. First, the bearer token is not your API key; it is a separate value generated from it, and pasting the API key into the Bearer slot is the classic 401. Second, regenerating the bearer token in the portal invalidates the previous one immediately, so an old value cached in your environment starts failing the moment you regenerate. Keep the current token in an environment variable and never hard-code it.
The way you send the token is standardized by RFC 6750, the OAuth 2.0 bearer-token spec: the value goes in an Authorization header prefixed with the word Bearer and a space. The fastest way to confirm a token authenticates is a single curl command, no script required:
curl "https://api.twitterapis.com/twitter/user/info?username=elonmusk" \
  -H "Authorization: Bearer $TWITTERAPIS_KEY"
If the token is valid you get an HTTP 200 and a JSON user object back in under a second. If it is not, you get a 401 with a message naming the problem, which is the fast feedback loop you want while you are still sorting out which credential belongs where. This same header works whether you are reading users, searching, or pulling a timeline.
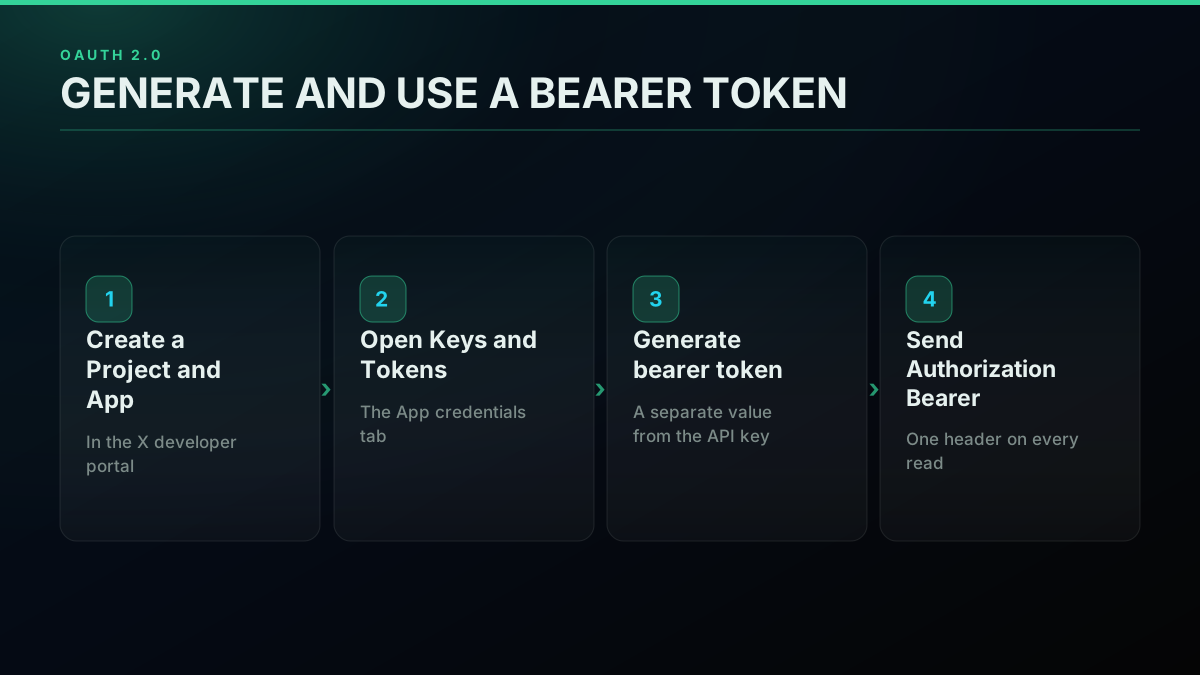
Generating and using an OAuth 2.0 bearer token, step by step
If you prefer to watch the portal steps end to end, this walkthrough covers getting the API key together with the OAuth client ID and secret:
For the fuller obtain-and-configure path, including the common rejection reasons that block a first key, see the how to get a Twitter API key guide, which pairs with this one: it gets you the credentials, and this guide authenticates with them.
Start building with TwitterAPIs
$0.0008 a call, about $0.04 per 1,000 tweets at 20 tweets a page. $0.50 free credits. No credit card required.
How Do You Authenticate a Twitter API Request in Python?
The shortest authenticated read in Python is a single GET with one header. Put your key in an environment variable, build an Authorization: Bearer header, send the request, and read the JSON. There is no SDK required and no signing step for a read. The example below authenticates against a direct API, TwitterAPIs, whose read flow is a plain bearer header, so the auth pattern is identical in shape to the official OAuth 2.0 app-only flow but with no developer-app setup behind it. The one dependency is the requests library.
# auth.py , run with: python auth.py
import os
import requests

API_KEY = os.environ["TWITTERAPIS_KEY"]

resp = requests.get(
    "https://api.twitterapis.com/twitter/user/info",
    params={"username": "elonmusk"},
    headers={"Authorization": f"Bearer {API_KEY}"},
    timeout=15,
)
resp.raise_for_status()
user = resp.json()["user"]
print(f'@{user["username"]}  {user["followers_count"]:,} followers')
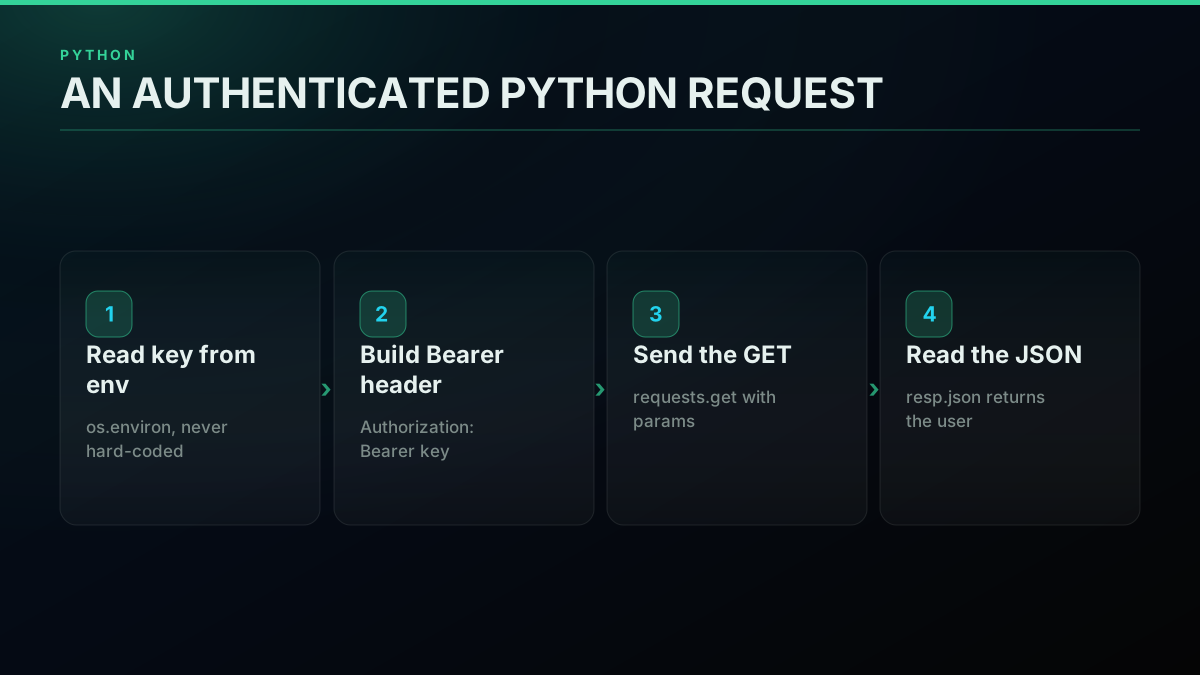
An authenticated Python request in four steps
The Authorization header is the whole authentication step. The key comes from the environment, never a literal in source, so it does not leak into version control. To run it, sign up in under a minute at the signup page, which issues $0.50 in free credits with no card, then export the key and run the script:
export TWITTERAPIS_KEY="your_key_here"
python auth.py
A successful authenticated call returns HTTP 200 and a user object, which is the signal that your credential validated:
{
  "user": {
    "username": "elonmusk",
    "name": "Elon Musk",
    "followers_count": 240922479,
    "is_blue_verified": true
  }
}
If you omit the header entirely, the API answers with a clear 401 and tells you exactly what is missing, rather than a cryptic OAuth signature error:
{"error": "unauthorized", "message": "Missing API key. Send `x-api-key: <key>` or `Authorization: Bearer <key>`."}
That message is the difference between a bearer-key API and OAuth 1.0a signing. When authentication fails here, the response names the problem. This is the read pattern the Python Twitter API tutorial extends with pagination and error handling, and the Twitter advanced search operators guide reuses the same header to run queries.
Twitter API Newbie
How Do You Authenticate the Same Request in Node.js?
Node.js needs no SDK for an authenticated read either. Node 18 and later ship a global fetch, so a plain GET with a URLSearchParams query string and an Authorization header is the whole integration. The credential goes in the exact same place as Python, the Authorization: Bearer header, and the response shape is identical, so you can port a script between the two languages without touching the auth logic.
// auth.mjs , run with: node auth.mjs
const API_KEY = process.env.TWITTERAPIS_KEY;

const url = new URL("https://api.twitterapis.com/twitter/user/info");
url.searchParams.set("username", "elonmusk");

const resp = await fetch(url, {
  headers: { Authorization: `Bearer ${API_KEY}` },
});
if (!resp.ok) throw new Error(`HTTP ${resp.status}`);

const { user } = await resp.json();
console.log(`@${user.username}  ${user.followers_count.toLocaleString()} followers`);
The two versions stay in lockstep: read the key from the environment, set the Authorization header, send the request, read the JSON. That symmetry matters because it means whatever you build on top, retries, concurrency, a paging loop, ports between Python and Node with only syntax changes. The Twitter API Node.js tutorial builds the fuller read client, and the Twitter API pagination guide adds cursor handling on the same authenticated base.
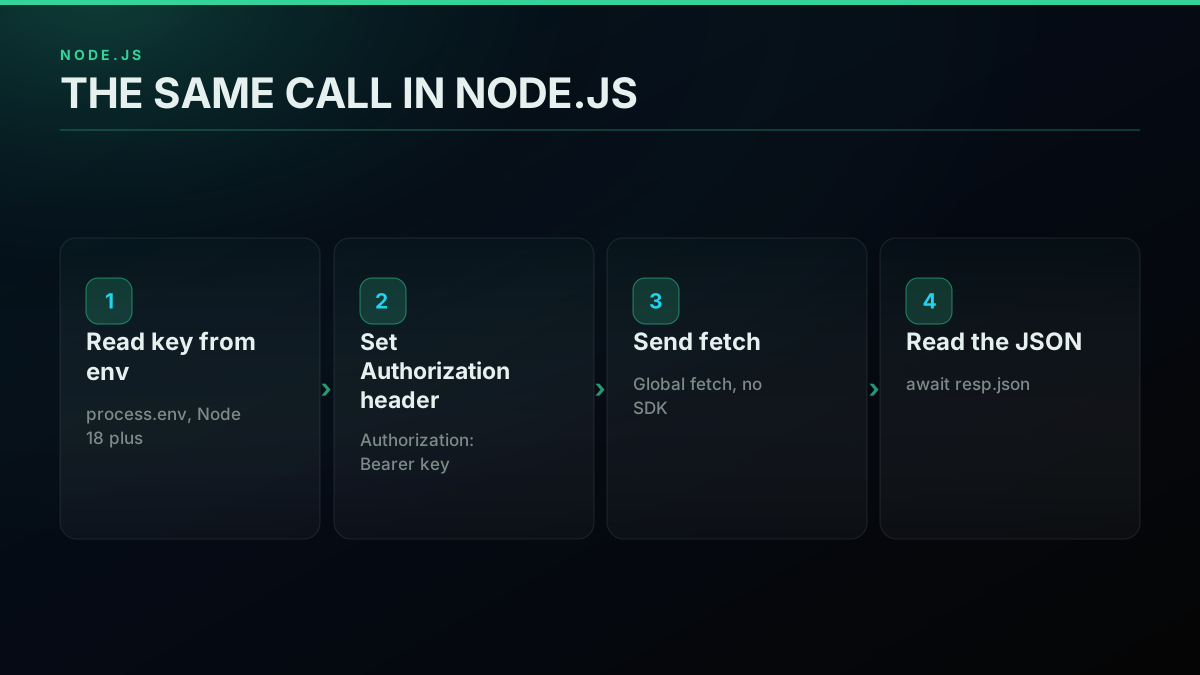
The same authenticated call in Node.js, same four steps
One deployment note: read the key from process.env, not a config file committed to the repo, and rotate it if it ever lands in a log. Authentication is only as safe as where you store the credential, and a leaked bearer key is a live credential until you revoke it.
Why Do You Still Get 401 Unauthorized After Adding Your Key?
A 401 Unauthorized, usually with X error code 32 - Could not authenticate you, means the credential you sent did not validate. It rarely means the key is fake. The four usual causes are: you sent the API key where a bearer token belongs, your OAuth 1.0a signing keys are mismatched or paired wrong, your system clock is skewed more than a few minutes so the OAuth 1.0a signature is rejected, or you regenerated a token in the portal and are still sending the old one. Work down that list in order and almost every 401 resolves. The fix for the most common case is simply swapping the API key for the actual bearer token in the Authorization header.
This is the error developers describe most, and the frustrating part is that it fires even when every value looks correct, because the credential is valid but wrong-typed or wrong-clocked. The Twitter API error codes reference lists the full set of auth-related codes with the exact response bodies, so keep it open when you are debugging a stubborn 401.
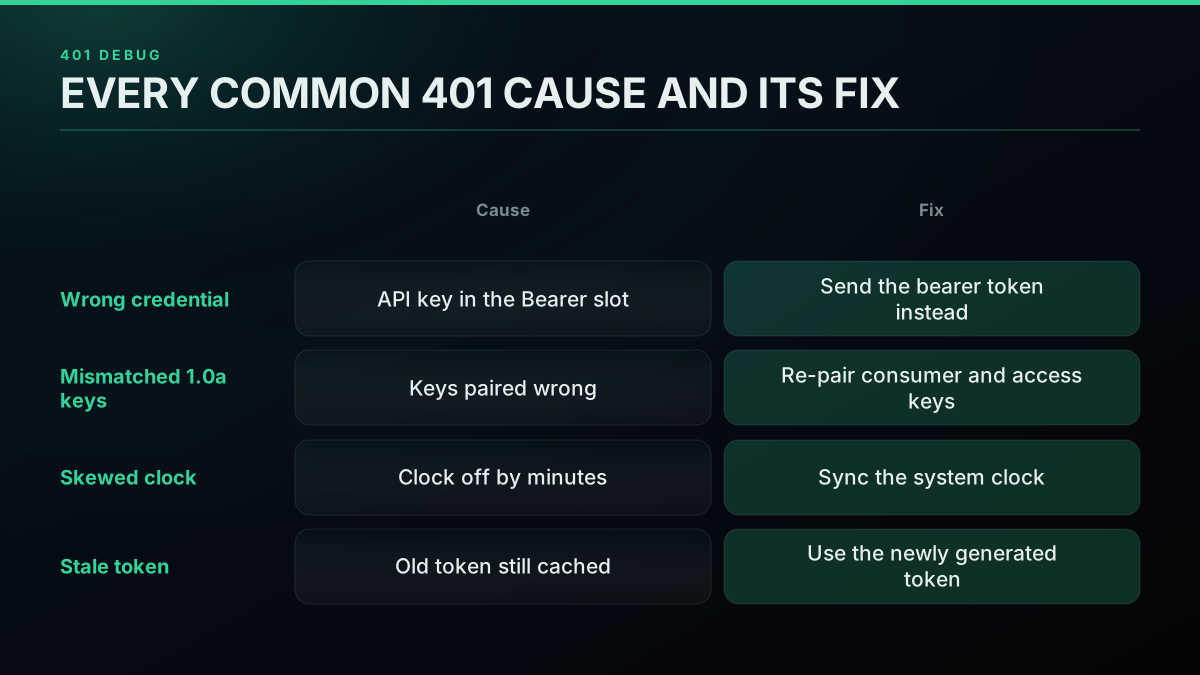
Every common 401 cause, and the fix for each
On a direct bearer-key API the same class of failure returns a message you can act on immediately. Sending a bad key returns Missing or invalid x-api-key header, which points straight at the credential instead of making you audit a signature. That clarity is the practical payoff of app-only bearer auth: the failure mode is legible. If your project is read-only, this alone can save the afternoons that OAuth 1.0a debugging tends to eat.
Why Does a Valid Bearer Token Return 403 Forbidden?
A 403 Forbidden is a different problem from a 401, and conflating them wastes hours. A 401 means you did not authenticate. A 403 means you authenticated fine but are not allowed to call that endpoint. The signature X returns most often is error 453, client-not-enrolled, which means your app is not attached to a Project, or your access tier does not include the endpoint you called. It is an authorization failure, not an authentication one. The fix is to attach the app to a Project in the developer portal, confirm your access level covers the endpoint, and set Read and Write permissions if you are posting, then regenerate tokens so the new permissions take effect.
Developers hit this constantly right after they think auth is solved, because the credential works and only the entitlement is missing:
403 Forbidden on Twitter Streaming with tweepy
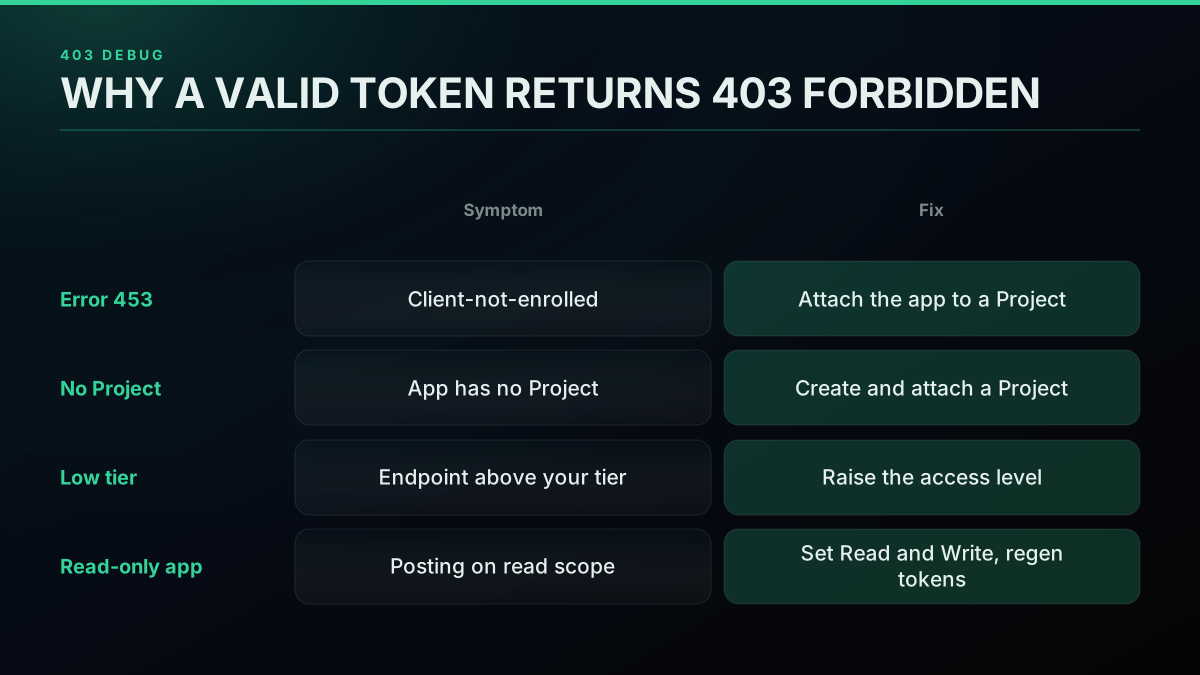
A 403 is an authorization failure, not an authentication one
The mental separation is worth internalizing: authentication proves who you are, authorization decides what you may do. When you see 403, stop re-checking your token and start checking your Project attachment and access tier. The Twitter API error codes guide has the full 403 breakdown, and if you are writing rather than reading, permissions and tier are where nearly all of it comes from.
The cheapest pay-as-you-go Twitter API. Try it free.
$0.0008 a call, about $0.04 per 1,000 tweets at 20 tweets a page. $0.50 free credits. No credit card required.
How Do 401 and 403 Fit Into One Authentication Path?
Both errors sit on the same request, at two different checkpoints. X first validates the credential itself: a missing or wrong-typed credential fails right there with a 401, before your app's entitlements are ever considered. A credential that validates moves on to a second, separate check, whether the app is attached to a Project and the access tier covers the endpoint, and failing that check returns 403 instead. Seeing the two checkpoints as one path, rather than as two unrelated error codes, is what makes debugging either one faster: a 401 sends you back to the credential, a 403 sends you to the Project and tier settings.
One path, two checkpoints
Where 401 and 403 Fire in the Same Request
How Do You Authenticate a Write, Acting as a User?
Reads authenticate the app; writes authenticate a person. To post a tweet, send a DM, follow, or like, X needs to know which account is acting, so a write uses user-context credentials rather than an app-only bearer token. Under OAuth 1.0a that means signing each request with your consumer key, consumer secret, and the target user's access token and secret. Under OAuth 2.0 user context it means an authorization-code flow with PKCE and explicit scopes such as tweet.write, after which you send a refreshable user access token. Either way the credential proves a specific user authorized your app, which is exactly why a read-only bearer token returns a permission error the moment it touches a write endpoint.
A direct API keeps writes possible without the OAuth machinery. On TwitterAPIs a write passes your own X session token per request and it is never stored, so posting a tweet or building a Twitter bot is a normal authenticated call: tweet creation and DM send are $0.0016, while simple actions like follow, like, and retweet bill at the standard $0.0008. The one-header pattern you used for reads extends to writes, which is how projects like a Twitter chatbot authenticate their replies without an OAuth 1.0a signature. The Twitter API v2 versus TwitterAPIs comparison covers how the two write models differ in practice. One caution holds on either API: automated writing is where platform spam rules bite, so throttle posts and respect the terms regardless of how you authenticate.
What Does Authentication Cost on the Official X API in 2026?
Authentication is free to set up on the official X API, but you cannot make a funded authenticated read until you attach a payment method, because new developers are defaulted to a pay-per-use model. In practice that means the auth path and the billing path are joined: your bearer token is useless until the account behind it is funded. This is the friction developers vent about, and it is why the real question is often not how to authenticate but whether the official route is worth the setup at all.

ahmet
@bruvimtired
bro why is the @X API so expensive?? @XDevelopers
On a direct API the cost of an authenticated read is transparent and there is no account to fund before you start. With TwitterAPIs, an authenticated read is $0.0008 a call returning up to 20 tweets, roughly $0.04 per 1,000 tweets on a full page, and every new account gets $0.50 in free credits at signup, about 625 calls, with no card. Writes cost more because they do more: tweet creation and DM send are $0.0016, full account history is $0.0024, and full thread expansion is $0.004. The authentication itself never carries a surcharge; you pay per call, and you can estimate a workload up front with the cost calculator.
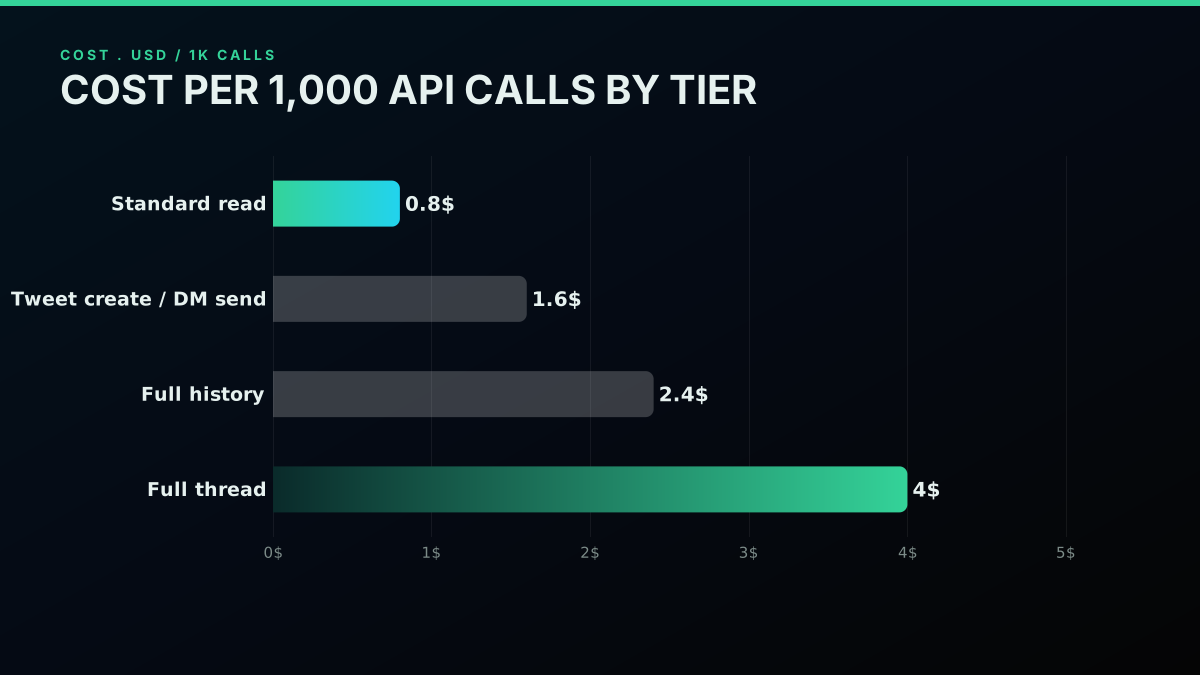
Cost per 1,000 calls, by endpoint tier
The write model deserves one clarification because it is widely misunderstood: a direct API does support writes. On TwitterAPIs a write like posting or sending a DM passes your own X session token per request rather than running an OAuth handshake, and that token is never stored. So this is not a read-only service; it is a service where reads use a bearer key and writes use a pass-through user credential.
Is There a Twitter API You Can Authenticate Without OAuth?
Yes. A direct pay-per-call API replaces the entire OAuth setup with a single bearer key for reads. You sign up with an email, copy the key, and send Authorization: Bearer <key> or the equivalent x-api-key header, and you are authenticated. There is no Project to create, no App to attach, no consumer-key-and-secret pair to sign with, and no access tier to negotiate. For a read-only workload this collapses the multi-step official flow into one header, and the $0.50 in free credits means you can confirm the whole thing works before spending anything.
Some clients prefer a dedicated header over the Authorization one, so the same key also works as x-api-key, which keeps your Authorization header free for other middleware:
curl "https://api.twitterapis.com/twitter/user/info?username=elonmusk" \
  -H "x-api-key: $TWITTERAPIS_KEY"
Both headers authenticate identically and return the same 200 and user object, so pick whichever fits your HTTP client. This flexibility is part of why teams moving off the official flow describe the switch as removing steps rather than adding them, and the official X API versus third-party comparison lays out the full tradeoff, as does the how to choose a Twitter API decision guide.
This is the pattern the code samples above already used, which is the point: the authenticated request looks the same as OAuth 2.0 app-only, because a bearer header is a bearer header. What changes is everything behind it, no developer account, no app review, no signing math. For writes you pass your own session token per request, so acting as an account is still possible without the OAuth 1.0a signature dance. The MCP server exposes the same authenticated surface to AI agents through one key, if that is your integration path.
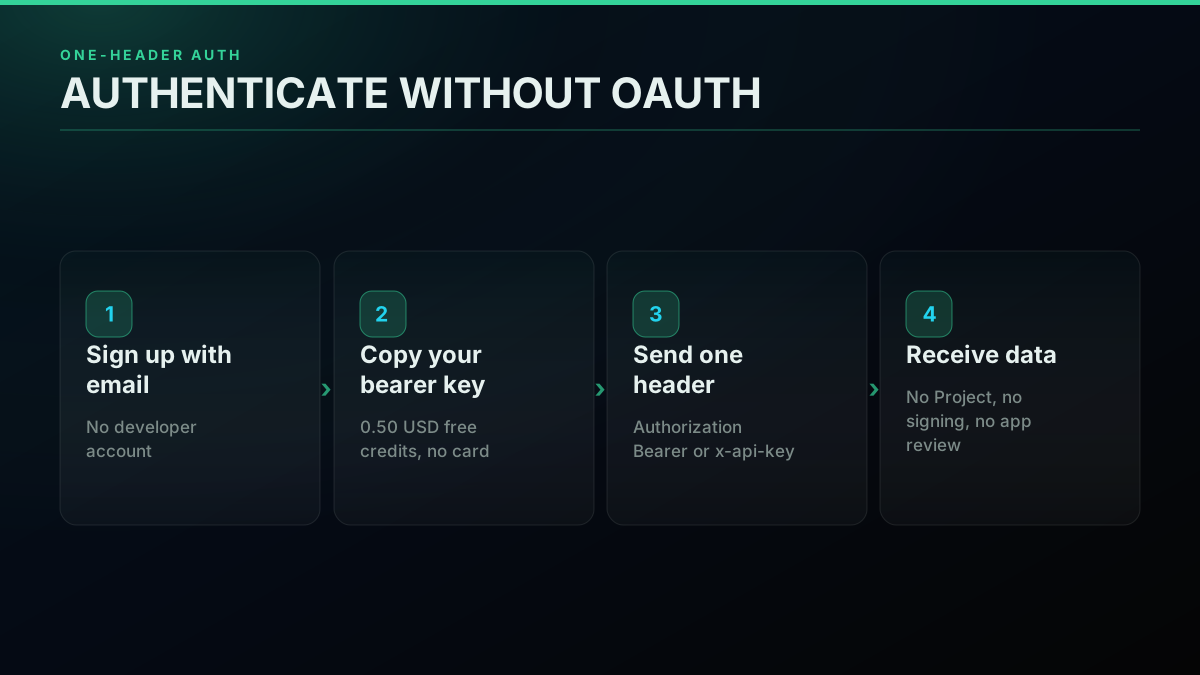
The one-header alternative: sign up, copy a key, authenticate
The honest tradeoff is that a direct API reads X data through the provider rather than straight from X, so you are trusting a middle layer. For many read-heavy projects that tradeoff is worth trading a week of OAuth setup and a funded developer account for a single header. Compare the options fully on the Twitter API alternatives page and price your specific workload with the pay-per-use pricing breakdown before you commit.
How Do the Two Authentication Models Compare?
Set side by side, the two models optimize for different things. The official OAuth flow gives you first-party access straight from X, at the cost of a developer account, an app attached to a Project, a funded pay-per-use balance, and OAuth 1.0a signing for writes. The direct bearer-key model gives you a one-header authenticated read in minutes with legible error messages and $0.50 to test, at the cost of reading through a provider. Neither is universally right. If you need official first-party writes at scale and can absorb the setup, run OAuth. If you are reading public data and want to skip the account and the signing, the bearer-key path is faster.
The decision usually comes down to read-versus-write and tolerance for setup. Read-only projects rarely benefit from the full OAuth machinery, while write-heavy products that must act as many users often want the official flow's account model. Map your own workload against the grid below and the choice is usually obvious within a minute.
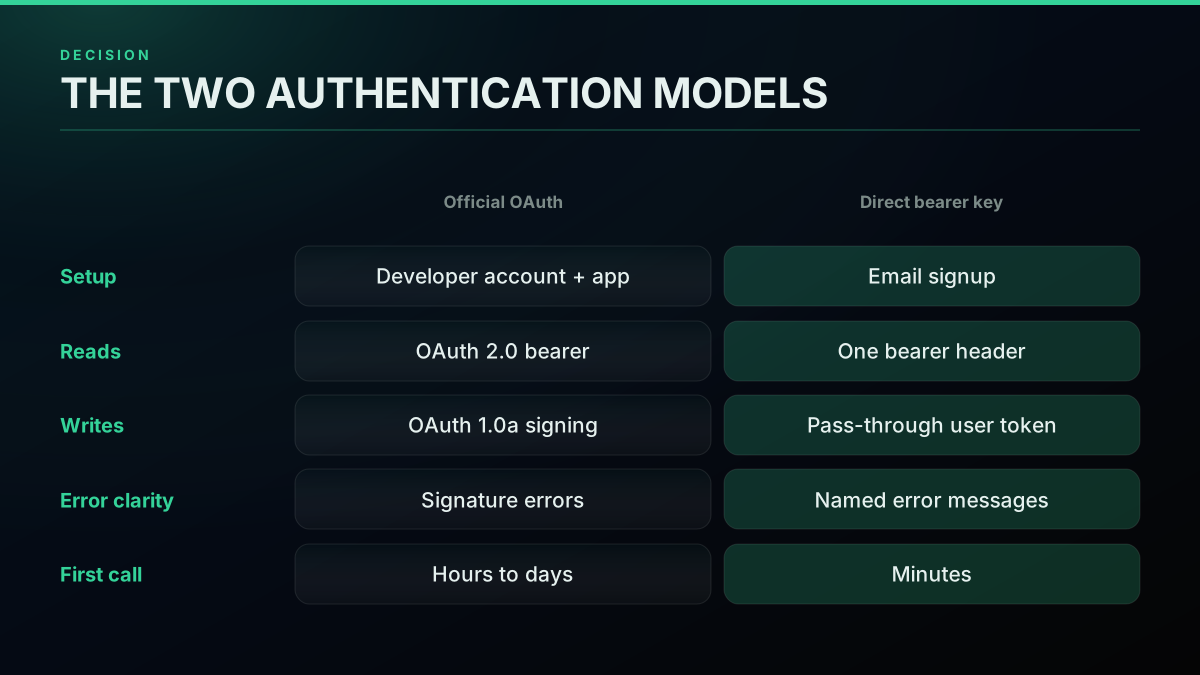
The two authentication models, side by side
Whichever you choose, the fundamentals in this guide hold: pick the flow that matches the job, send the right credential in the Authorization header, and read a 401 as a credential mismatch and a 403 as an entitlement gap. For the full endpoint surface once you are authenticated, the Twitter API reference hub is the map, and the complete Twitter API tutorial carries the request lifecycle from here. If you want to authenticate a read in the next five minutes, grab a key on the signup page and send one header.
// sources
Where these numbers come from
Each row is a figure in this post and the artefact it was read from. Prices and limits on this platform move, so check the date on the source before you plan against it.
- X OAuth 2.0 overview
- Backs the read path in the summary, that public data is read with an OAuth 2.0 app-only bearer token sent as Authorization Bearer.
- X OAuth 1.0a API key and secret reference
- Backs the write path, that acting as a user requires OAuth 1.0a user-context signing with the API key, API secret, and per-user access tokens.
- RFC 6749, the OAuth 2.0 authorization framework
- The standard the post says X authentication follows, which grounds its explanation of why two concurrent OAuth flows plus an access-tier check make a request able to authenticate and still be refused.
- RFC 6750, OAuth 2.0 bearer token usage
- The specification for how the token is sent, the value in an Authorization header prefixed with the word Bearer and a space, which is the shape used in every code sample here.
- Tweepy authentication documentation
- Quoted directly for the claim that a bearer token is generated in the developer portal under an app's Keys and Tokens tab rather than in code.
- RFC 7636, PKCE
- Backs the OAuth 2.0 user-context write flow described in the post, an authorization-code exchange with PKCE and explicit scopes such as tweet.write before a refreshable user token is issued.
Frequently Asked Questions
Every request to the X API carries a credential in an Authorization header, and X checks it before returning data. There are four credential types across two OAuth flows. OAuth 2.0 app-only uses a single bearer token to read public data on behalf of your app. OAuth 1.0a and OAuth 2.0 user context use a signed combination of your API key, API secret, and per-user access tokens to act as a specific account, which you need for writes like posting. The credential you send must match the flow the endpoint expects, or the call fails with 401 or 403. A direct API like TwitterAPIs collapses this to a single bearer key for reads and a pass-through user token for writes, with no developer-app setup.
A 401 with error code 32 means the credential you sent did not validate. The usual causes are sending the API key instead of the bearer token, a mismatch between OAuth 1.0a signing keys, a system clock skewed more than a few minutes which breaks the OAuth 1.0a signature, or a regenerated token that invalidated the old one. Fix it by confirming you are sending a bearer token for reads, regenerating tokens in the developer portal if in doubt, and checking your machine clock. On a direct bearer-key API the same failure returns a clear message like Missing or invalid x-api-key header, with no signature math to debug.
For the official X API, yes. You create a developer account, an app inside a Project, add a payment method, and generate credentials before your first authenticated call, because new developers are defaulted to a pay-per-use model. For a direct third-party API you do not. With TwitterAPIs you sign up with an email, copy a bearer key, and send an authenticated read immediately on $0.50 of free credits, with no app, no project, and no card. Writes use your own X session token passed per request rather than an OAuth handshake.
The API key and secret, also called the consumer key and secret, are your app's root identity. You never send them raw on a normal request. The bearer token is derived from them and is what you actually put in the Authorization header for OAuth 2.0 app-only reads. In short, the API key and secret prove who the app is and are used to mint tokens, while the bearer token is the short credential you send on each read request. Sending the API key where a bearer token is expected is the single most common cause of 401 Could not authenticate you.
A 403 means you authenticated successfully but are not allowed to call that endpoint. The most common X API case is error 453, client-not-enrolled, which means your app is not attached to a Project, or your access tier does not include the endpoint you called. It is an authorization problem, not an authentication one. Attach the app to a Project in the developer portal, confirm your access level covers the endpoint, and set Read and Write permissions if you are posting. The credential is fine; the account entitlement is not.
On the official X API the auth path itself is free, but you must fund a pay-per-use developer account before any read returns data, and reads are metered per resource. On TwitterAPIs an authenticated read call is $0.0008 and brings back up to 20 tweets, so roughly $0.04 per 1,000 tweets on a full page, with $0.50 in free credits at signup, about 625 calls, and no card. Premium calls cost more: tweet creation and DM send are $0.0016, full account history is $0.0024, and full thread expansion is $0.004. Authentication does not add a surcharge; you pay per call.
Check out similar blogs
More guides on the Twitter/X API, scraping, and pricing.

Twitter API Tutorial 2026: The Complete Developer Guide
The 2026 Twitter API tutorial built after the pricing collapse. Auth, endpoints, code, rate limits, real costs, and the alternative when official gets too expensive.

How to Get Image URLs from X Tweets via API in 2026 (Full Resolution, Python and Node)
Pull image URLs out of X tweets with runnable Python and Node.js, then get the full-resolution original instead of the scaled copy the API hands you by default. Measured on 14 live images, with the video poster-frame trap and the per-call cost.
How to Get Everyone Who Retweeted a Tweet via API (2026)
Pull the full list of accounts that reposted any tweet with a real 2026 API. Runnable Python and Node.js, cursor pagination for the whole list, a real amplifier ranking over live data, a bot filter, and the honest per-call cost.
How to Get All Replies to a Tweet via API (2026)
Pull the replies under any tweet with a real 2026 API. Runnable Python and Node.js, cursor pagination, the conversation_id tail sweep for the long tail, nested replies-to-replies, signal-versus-noise filtering over live data, and the honest per-call cost.
Twitter API Pagination 2026: How next_token Works (and a Simpler Alternative)
How Twitter API pagination works in 2026. The official next_token loop explained field by field, a simpler single-cursor alternative, runnable Python and Node code, and the real per-call cost of a paginated pull.
How to Search Tweets by Hashtag via API 2026 (Python + Node.js)
Search tweets by hashtag with a real 2026 API in Python and Node.js. Runnable code for the hashtag operator, engagement filters, cursor pagination, deduping retweets, counting authors, and the real per-call cost.
Fetch a Full Twitter Thread via API in One Call (2026)
How to pull an entire Twitter thread, the root tweet plus every connected tweet in the chain, in a single API call with the tweet/thread endpoint, instead of walking replies by hand. Live-tested code in curl, Python, and Node.js, with the real per-call cost.

How to Build a Twitter Bot in 2026: The Complete Guide
Build a Twitter bot in 2026 with no-code or Python. Working Tweepy code, auth explained, and the cheap path: $0.0008 a call, 20 tweets a page.